How to Copy Screenshots from Oculus Quest 2 to a PC or Mac
It’s pretty easy to transfer Oculus Quest 2 screenshots to your Mac or Windows PC. We’ll show you how to do it, but first, let’s highlight everything you need for a successful transfer.
Your VR headset saves all the screenshots that you take on your Quest 2 as 1024×1024 JPEG image files. You can copy these files just like you copy files from your Android phone. However, you need to ensure that the USB-C cable you plan to use matches your PC or Mac’s port. Besides, Mac owners will need the free File Transfer Utility.
Once you have everything set, start your Oculus Quest 2 and log in to your Mac or PC. Connect your computer and the Quest headset through the USB-C port on the side and then put on the headset.
A message will appear on your Quest screen requesting you “Allow Access to Data.”
Click “Allow,”
Remove your headset and proceed with the instructions below.
Copy Quest Screenshots to a Windows PC
If you’ve already linked up through the process discussed above, follow the steps below to transfer screenshots from Quest 2 to Windows.
- Open “File Explorer.”
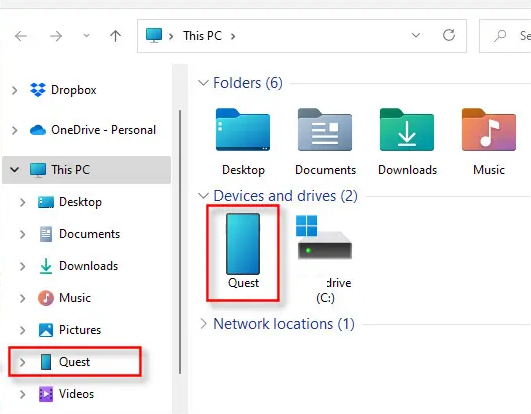
- Locate and click “This PC” in the sidebar.
- Select “Quest 2.”
- Alternatively, open “This PC” and select “Quest” under “Devices.”
5. Double-click the “Quest 2” icon.
6. Navigate to the “Oculus” folder where your screenshots are saved.
7. Locate a file titled “Screenshots.”
8. You can drag the entire folder to your desktop to transfer all screenshots or open it to copy and paste individual screenshots.
Once you’re done transferring, you can unplug the Quest 2 from the PC.
Copy Oculus Quest Screenshots to a Mac
Ensure you have the Oculus Quest 2 linked to your Mac and follow the steps below.
- Open “Android File Transfer App.”
- Double-click “Oculus” from the list.
3. You’ll find the “Screenshots” folder, which you can open to copy individual screenshots or drag the entire folder to your Mac.
Now, you’re all set. Feel free to unplug the Quest 2 from your Mac and access all the screenshots on your computer.


